A checklist consist of a header row which expands to display each version of that checklist. A checklist can have several approved versions, several of which can be in use at any given time.
To create a checklist, you must have already created the check items that will be checked.
The steps for creating a checklist are:
- Create a checklist type which defines the permissions required for creating checklists of this type.
- Create check items or confirm that relevant ones already exist in Check Item Templates and that they are relevant for the product type.
- Check and update product specifications for each check item template for the specific product or products you are working on.
- Create a new checklist for a specific product type. Both the checklist header and the first unapproved checklist version will be created at the same time.
- Edit the checklist version to add steps.
- Approve the checklist version.
To use a checklist, you will need to carry out these steps:
- Add the checklist to a draft workflow version by referencing it in a checklist action.
- Add the workflow and BoM if one exists to a draft recipe and approve it.
- Schedule a job for it in Schedule Manager.
- Book onto the job in a workstation and progress to the checklist action.
Create a Checklist Type
A checklist type defines the permission needed to e-sign checklists of this type. Note that this is the permission required for creating a checklist, not the permission to record checklist results. To create a checklist type:
- Navigate to the Checklists page and click the Checklist Types button to display the New Checklist Type popup.
- Provide a name (mandatory) and select an e-sign permission (optional).
Create a new Checklist
When a new checklist is created, a checklist header as well as the first version of the checklist are created.
- Navigate to the Checklists page and click the New button.
- Complete the New Checklist input screen
New/Edit Checklist input screen
The following properties can be defined:
Blue fields in the form are required and are flagged with an asterisk (*) in this document.
- Name*: Provide a name for the checklist.
- Type*: Select the checklist type for this checklist.
- Product Type*: Select the product type the checklist will be used for.
- Active*: Active checklists
- Click the Save button to create the checklist header and the first version of the checklist.
Edit Checklist versions
Checklists are versionable to support change control.
- Navigate to the Checklists page and select select a revision and click the Edit button.
- Complete the Edit Checklist Version input screen.
Edit Checklist input screen
The following properties can be defined:
Blue fields in the form are required and are flagged with an asterisk (*) in this document.
- SUID
- Description: Describe this version of the checklist.
- Instructions: Provide instructions for the checklist version.
- Document Search: The search term here will filter the next field to display only document that contain the search term.
- Document: Select a document.
- eCHR Required: If set to Yes then any results captured against this checklist will be stored in eCHR data store.
- Results eSign Permission: Select the permission required to e-sign the results for this checklist version.
- Notes: Leave a note.
- Approval Status*: Specify the approval status. Options: Unapproved, Approved, Superseded/Obsoleted.
- Approval From: Approval from date.
- Approval To: Approval to date.
Steps
These are specific actions or checks within the checklist. Each step corresponds to a predefined attribute, variable, or text parameter, which determines the type of data to be collected and its default specifications.
Note that you might well have multiple check steps that reference the same check item template, for example
- You need to take the same measurement on a number of different sample items (e.g. measure height of 10 different cups / mould positions).
- You need to take a measurement in a number of different positions on the same item (e.g. measure height at 3 different positions around a single cup).
Each of these checks is a separate check step entity with its own name that can be edited individually and ordered relative to each other.
Example: Check step ordering and naming
This example demonstrates how you would use steps and ordering of the steps to achieve the checks on an item in the most efficient way.
You have a plastic injection moulding machine. A mould makes 6 items each cycle in the mould shown.
 Figure 1: Single mould
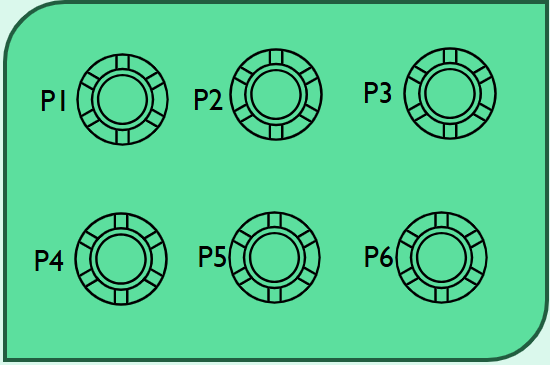 Figure 2: Six mould positions (P1 - P6)
The check list requires a check against all 4 templates below for each mould position making it a total of 24 steps.
Note
It is recommended to minimise characters on check step names to avoid the action on the workstation becoming too busy.
- Check outer diameter using vernier calliper (See Figure 2): Step name: OD.
- Check inner diameter using vernier calliper (see Figure 1): Step name: ID.
- Check weight using scales: Step name W.
- Check for defects visual check: Step name Def.
The checklist steps can be ordered in the check step list to ensure that they are presented to the operator in an optimal way.
- Measure internal and outer diameter for all mould positions – Steps ODP1, IDP1 / ODP2, IDP2/ .... / ODP6, IDP6.
- Inspect and weigh all mould positions – Steps DefP1-6 then WP1-6.
When you have a series of check steps that reference the same check item template with the same instructions, these will be presented to the operator as one grouped line with an input field for every step.

Create Checklist Steps
1. Navigate to the Checklists page, select a version of an unapproved checklist and click the Steps button. Each step is displayed as a row in the Steps screen. You can drag and drop rows to set the sequence in which the steps must be performed (see the example above).
2. Complete the New Checklist Step input screen.
Add/Edit Checklist Step input screen
- Check Item Search: Filter the items displayed in the Check Item field based on this search term.
- Check Item*: List of check items relevant for the product type.
- Prompt*: Words that are displayed to prompt the operator to answer accurately. The box will auto populate with the check item template default prompt but you can change it here if you want.
- Detailed Instructions: You may want more specific instructions for this check specific to where it is going to be used in the workflow/manufacturing process.
- Document Search: Filter the items displayed in the Document field based on this search term.
- Document: List of documents.
- Upload button: You can upload a new document.
- Secondary Approval*: Is secondary approval required. Options: No (default), Yes.
- Compulsory*: Is this step compulsory? Options: No, Yes (default).
- Comment*: Does this step require a comment? Options: No (default), Yes.
- Create Multiple Steps* toggle: Toggle to Yes to create more steps that perform the same check. Options Yes, No (default).
- Steps*: This field displays when the Create Multiple Steps toggle is set to Yes. Here you specify the number of steps for this check.
- Name: The prefix assigned to the each step of the check.
History
You can access the history of a checklist step group by selecting the checklist step group and clicking the History button. It provides details such as the sequence, last edited date and who edited a step.
Result Sets
The Result Sets screen displays a list of check result sets related to the selected checklist version. You can see when the result sets were recorded and the product and serial number they relate to. To view the details of each result set, you have to go to the requisite Item Status screen for each item identified.
Recycle Bin
Click the Recycle Bin button to view deleted checklist steps. You can access the revision history of a deleted item You can also click the Recycle Bin For Linked Records to view linked items that were also deleted by deleting the checklist step.