Workflow actions also called operation actions, defines the actions an operator would need to perform to execute an operation. For example, it could be performing an assembly, ticking things on a checklist, compiling a kit, etc. Where actions are used by more than one workflow, the Shares Actions UI feature allows you to build the action once and use it wherever required.
You can access the Operation Actions screen in one of the following ways:
- For workflows in draft status: In the Workflow screen, select the workflow version, click the Design Workflow button, and right-click on an operation and select Actions.
- For workflows in pending approval and approval status: In the Workflow screen, select the workflow version and click the Operations button.
Add/Edit New Action
The Add/Edit New Action screen is the same for each of the action types described below.
- Navigate to the Operation Actions screen.
- Click Add to display the Add New Action input screen.
- Complete the Add New Action input screen.
Add/Edit New Action input screen
The following properties can be defined for Add/Edit New Action:
Blue fields in the form are required and are flagged with an asterisk (*) in this document.
- Action Type*: Type of action to perform as part of the workflow operation.
- Shared Action*: When action type is Shared Action, you can select the shared action from the dropdown.
- Name*: Name of the action.
- Instruction Text: Instruction text that displays for this action.
- Button Profile*: Defines the buttons that will be displayed on the screen when performing this action. Check the Action Type section below to make sure you select the correct button profile.
- Complete Mode*: It is predominantly used when the operator is expected to book onto multiple jobs concurrently that share an action, and relates to how completion of the action is recorded. For example, you could be booked onto 6 jobs at the same time that all share the same action. If the 6 jobs using that action are not identical, you will need to view each action to record completion. If the 6 jobs are identical and you have the same action screen, you can record the completion once for all six. The Complete Mode options controls this. Values:
- MustViewToComplete: You must load each action and complete it individually.
- AllowSilentComplete: You can tick the checkboxes for multiple jobs in the Workstation screen to display the Complete button. Clicking it completes each of the selected jobs.
- Start Exp.: Use a predefined expression to decide when this action can start. For example, start when 60 minutes has passed since previous operation has completed.
- Complete Exp.: Use a predefined expression to decided if the action can complete. For example, the action can be completed if 60 minutes has passed since the start of the action.
- Skip Exp.: Use a predefined expression for when this action will be skipped. For example, the action will be skipped if a data collection in the previous action resulted in an OK value.
- View Mode*: Defines when this action is required. Values:
- Both: This action applies to both non-rework and rework.
- Non Rework Only: This action applies only if the operation is opened for non-rework.
- Rework Only: This action applies only if the operation is opened for rework.
- Required*: Specifies if this action must always be performed.
- Force Book-Off*: Specifies if you will be automatically booked off the operation when you completed this action. For example, the first action for baking pies is load oven. After that, the person books off because they loaded the oven. They don't need to stay booked on. The next action would be the unload oven which happens some time later. You wouldn't do these one after the other.
Another example is for subcontracting work. The first action is to send to subcontractor. After it's sent, you will book off the action. The second action would be receive back from subcontractor. You wouldn't do these one after the other.
The default behaviour is when you complete one action in an operation, if there's a subsequent action, you will always load that action.
- Force Individual view*: You must view the action of each job individually. It doesn't prohibit you from booking onto two jobs at the same time, but you must book onto each job individually so that you see the action screen for each. For example, you are making batches of pies and two jobs (trolleys) can go into the oven at the same time.
- Scenario 1: If you need to record the oven temperature, you can wheel both trolleys into the oven, load an action screen that's shared for both jobs and record the oven temperature because it applies to both jobs.
- Scenario 2: If you need to record the temperature of the pies, you'll need two data collection screens, one for each job. You will need to Force Individual View to load the first screen to record the temperatures for the first pies and a second screen to record the temperatures for the second pies. They can still be put into the oven at the same time.
- eCHR required: If yes, the completion of this action will be recorded in the eCHR (provided the eCHR profile assigned has a section configured for "Action Completion" or this will error).
After creating the new action, you'll need to select the action and configure it based on the action types. The input screen for each is described below.
Disable/Enable
You can disable an action. If you record any data against that action, you can't delete the action, but you can disable it. Disabled actions can be enabled again.
Import
You can select any action from any other workflow to import.
There are two ways to import an action:
Method 1
- Select a line type, line config (both are mandatory), workflow (optional), specify if you want to display all versions and click search.
- All workflow actions related to your search criteria are listed.
- Select a workflow action and click the Import button.
Method 2
- Click the Import By Action ID button to display its popup.
- Provide the Action ID you want to import and click Import.
Revision History
The Revision History page tracks changes to changes to the selected action.
Action Types
Actions are defined by their action types. The list of action types are:
- Backflush
- Build
- Checklist
- Custom
- Image/Documentation Capture Action (second most common action)
- Kit Material
- Label Print
- Label Print With Preview
- Rich Text Viewer
- Shared Action
- Simple Instruction (most common action)
- Tool Use
Backflush
It is a method of accounting for the use of materials based on the quantities defined on the BoM. Transactions to account for the use of backflushed resources such as the consumption of raw material are created on completion of action rather than being booked when the resources are actually consumed.
When you do a backflush, you consume the quantity from the BoM at the time of the completion from the oldest lot. This may differ from the time when the consumption was actually done, the actual quantity consumed and the actual lot consumed.
In a backflush action, you would mark x items as being completed. The system will calculate what child materials were consumed to complete x items. For example, you have a hopper containing pastry that is used to make sausage rolls. If you completed 10 sausage rolls, then you know what was consumed from the hopper to produce those sausage rolls. You will use backflush to reduce the stock that was consumed in the hopper to produce the 10 sausage roles. The hopper can be continually topped up without the volume of pastry being pre-assigned to a specific number of sausage rolls.
To create and configure a backflush action:
- Complete the Add/Edit Action input screen as described in the section above. Make sure you selected the Backflush Button Profile which displays the Complete button. When you click the Complete button at the end of the action, the stock used will be calculated and reduced at that point.
- After creating the backflush action in the Operation Actions screen, select the action and click Configure to display the Backflush popup.
- Complete the backflush input screen.
Backflush input screen
The setup here defines how information is displayed, and which buttons and functions are available to the operator on the device when working on the action.

The following properties can be defined for Backflush:
Blue fields in the form are required and are flagged with an asterisk (*) in this document.
Backflush screen
- Allow Receipt At Point Of Consumption checkbox: Default is unticked. Options:
- Checkbox ticked: If a child item is not in stock, you can create the item at the point of consumption (this action) and mark it for backflush. The Receive button will be displayed on the Items Found screen to allow you to receive the item to be used in the action.
- Checkbox unticked: The stock item needs to already exist in the system.
- Required checkbox: Check if the BoM for this action is required. Default is ticked.
- Default To Fefo: First expiry first out (FEF0). Check this checkbox if you want the system to allocate material on the basis of first expiry. Default is ticked.
- Always Prompt For Qty checkbox: When checked, you will be prompted to specify how many of the item you are allocating. If it is unchecked, then it will automatically allocate the quantity specified for the BoM slot.
- Do Not Focus On Slot checkbox: If this box in unchecked, the system will automatically select the next material in the list once the first material in the list has been satisfied. This is the order that is defined in the BoM.
- Location Filtering radio buttons: Define where the stock comes from based on location. Options:
- Do Not Filter: Don't filter stock items according to location. This is the default selection.
- Allow Build From Work Centre Locations: Filter by material that is available at a work centre location.
- Warehouse: You can only pick stock items from the selected warehouse.
- Slot Filtering Sections: Define how BoM Slot items should be filtered. For more information, see Slots and Candidates documentation. Options:
- Default View*: Select to show all slots or only incomplete slots.
- Restrict Slots*: Options for restricting BoM items to specified operations:
- Unrestricted: No slot restrictions apply.
- Restricted by Slot Type: Select the specific slot type in the Slot Type field below. The Slot Type field is only active when this option is selected.
- Restricted by Named Slots: Name the specific slot. This option displays the Restricted/Named Slots section. Click the Add button to display the Add Slot popup where you select the BoM Slot and specify the quantity. For example, the first 5 should be allocated to Op 10 and the last 5 to Op 20.
Build
A build action is the most common action type. When you start the works order, you assign materials required for the job. This material is accounted for and stock is adjusted before the work to produce the material item you are building starts.
To create and configure a build action:
- Complete the Add/Edit Action input screen as described in the Add/Edit New Action section above. Make sure you selected the ActionButton Profile.
- After creating the build action in the Operation Actions screen, select the action and click the Configure button to display the Build popup.
- Complete the Build input screen.
Build input screen
The setup here defines how information is displayed, and which buttons and functions are available to the operator on the device when working on the action.

The following properties can be defined:
Blue fields in the form are required and are flagged with an asterisk (*) in this document.
Build input screen
- Allow Receipt At Point Of Consumption checkbox: Default is ticked. Options:
- Checkbox ticked: If a child item is not in stock, you can create the item at the point of consumption (this action). The Receive button will be displayed on the Items Found screen to allow you to receive the item to be used in the action.
- Checkbox unticked: The stock item must already exist in the system.
- Required checkbox: Check if the BoM for this action is required. Default is ticked.
- Default To FEFO checkbox: Tick the Default To FEFO (First-Expiry, First-Out) checkbox if you want the system to allocate material on the basis of first expiry. Default is unticked.
- Hide Accept Suggestions Button checkbox: If this box is unticked and the Default to FEFO box is ticked, then the Accept Suggestions button is displayed in the workstation. When the operator clicks this button, the system will automatically allocate material based on first expiry and will change the status for each BoM slot to Slot Satisfied. Default is unticked.
- Always Prompt For Qty checkbox: When ticked, you will be prompted to specify how many of the item you are allocating. If it is unticked, then it will automatically allocate the quantity specified for the BoM slot. Default is unticked.
- Do Not Focus On Slot checkbox: If this box in unticked, the system will automatically select the next material in the list once the first material in the list has been satisfied. This is the order that is defined in the BoM. Default is unticked.
- Allow Kitted Items Only checkbox: If ticked, it limits the materials used in the job to only those that have been specifically assigned to it. It only lets you use kitted items for the current job. Default is unticked.
- Build Qty Mode*: Default: Item Based. Options:
- Item Based: The entire BoM quantity for the job is consumed at the operation even if the entire job quantity has not yet arrived at the operation. For example, the job is for 100 chairs and therefore required 400 legs. The 4 legs per chair are attached at operation 30. If 20 chairs arrive at operation 30, then you will consume 400 legs.
- Visit Based: Only the BoM quantity for the number of items at the operation will be consumed. For example, the job is for 100 chairs and therefore required 400 legs. The 4 legs per chair are attached at operation 30. If 20 chairs arrive at operation 30, then you will consume 80 legs.
- Location Filtering radio buttons: Define where the stock comes from based on location. Options:
- Do Not Filter: Don't filter stock items according to location. This is the default selection.
- Allow Build From Work Centre Locations: Filter by material that is available at a work centre location.
- Warehouse: You can only pick stock items from the selected warehouse.
- Slot Filtering: Define how BoM Slot items should be filtered. For more information, see Slots and Candidates documentation. Options:
- Default View*: Select to show all slots or only incomplete slots.
- Restrict Slots*: Options for restricting BoM items to specified operations. Options:
- Unrestricted: No slot restrictions apply.
- Restricted by Slot Type: Select the specific slot type in the Slot Type field below. The Slot Type field is only active when this option is selected.
- Restricted by Named Slots: Name the specific slot. This option displays the Restricted/Named Slots section. Click the Add button to display the Add Slot popup where you select the BoM Slot and specify the quantity. For example, the first 5 should be allocated to Op 10 and the last 5 to Op 20.
Checklist
Operators record results against checklists created in the system. For more information on creating and managing checklists, see checklists.
A checklist action can be configured to direct the user to either a specific checklist or to give them a choice of checklists at the point of execution.
To create and configure a checklist action:
- Complete the Add/Edit Action input screen as described in the Add/Edit New Action section above. Make sure you selected the ActionButton Profile.
- After creating the checklist action in the Operation Actions screen, select the action and click the Configure button to display the Checklist popup.
- Complete the Checklist input screen.
Build input screen

- Checklist Type: If you select a Checklist Type and leave the Checklist field blank, an operator will be prompted to select a checklist of that type at the point of execution.
- Checklist: Select a specific checklist that an operator must use. Leave this field blank to prompt the user to choose from a list of approved checklists at the point of execution, based on the checklist type selected.
- Version Control*: Define which version of the checklist is listed for the operator to choose from. Options:
- Use latest approved version
- Use latest approved minor version for specified major version
- Use specified version
- Major Version No: Mandatory if Use latest approved minor version for specified major version or Use specified version is selected under Version Control.
- Minor Version No: Mandatory if Use specified version is selected under Version Control.
- Rework Checklist Mode*: If you end up at an action again in rework mode, and there's already a check results set for that checklist you can choose one of the following:
- New Result Set: Redo a new check result set.
- Edit Existing (default): Continue editing an existing check result set.
Review and Sign eCHR Workflow
It is possible to close a job before the eCHR is closed because there may be post-job actions that can still be recorded in the eCHR. You can however keep an action open until a specified eCHR review and sign mode was completed. To do this:
- Complete the Add/Edit Action input screen as described in the Add/Edit New Action section above. Make sure you selected the Action Button Profile.
- After creating the Review and Sign eCHR action in the Operation Actions screen, select the action and click the Configure button to display the eCHR Review and Sign pop-up.
- Select eCHR Review and Sign Mode: By the time you finish this action you have to satisfy one of the following:
- Sign Lines Only: Have all the eCHR lines signed.
- eCHR Pending Approval: The eCHR must be in a Pending Approval status, i.e., fixed.
- eCHR Approved: The eCHR must be approved.
When this is set in the action, it embeds the listing in the action screen. The Action screen in the workstation now lets you perform all the same tasks available in the eCHR Listing screen. The buttons displayed are limited to what your permissions allow.
Sign an eCHR Line
Users with the required permissions can sign an eCHR line from one of the following:
- Workstation (via the eCHR button if it's configured).
- Item Status page with eCHR selected in the View field.
- Content page via the eCHR Listing screen.
Image/Document Capture Action
This action enables an operator to either take a photo using their device’s camera, upload an image from their computer, or submit documents of a designated type. Examples of this could be scans of actual documentation or labels relating to the item or photos of finished/non-conforming items.
- Complete the Add/Edit Action input screen as described in the Add/Edit New Action section above.
- After creating the Image/Document Capture Action in the Operation Actions screen, select the action and click the Configure button to display the Image/Document Capture - Design View pop-up.
- Select the Document Type. This is the format of the file that will be captured by the operator.
The operator will be presented with the screen below to capture or upload a file.

Rich Text (Document Controlled)
This action displays a Rich Text File that is saved and managed in the Document Manager. This allows you to build more complex instruction layouts and designs directly into the system (e.g., a mixture of text and pictures), and reference them from multiple locations/workflows.
- Complete the Add/Edit Action input screen as described in the Add/Edit New Action section above.
- After creating the Document Controlled Rich Text in the Operation Actions screen, select the action and click the Configure button to display the Document Controlled Rich Text pop-up.
- Complete the Document Controlled Rich Text screen.

- Document Type: Select a Document Type. The drop down will be limited to documents of that type.
- Document: The documents available for selection is filtered according the the Document Type selected.
- Version Control*: You can specify which version to use. Options: Use latest version, Use latest minor version for specified major version, Use specified version.
- Major Version: Depending on your Version Control field selection, you may need to provide a major version.
- Minor Version: Depending on your Version Control field selection, you may need to provide a minor version.
Rich Text Viewer
You can also build the content of the Rich Text File directly within the workflow action which will be unique to the action you are working on. It must be changed within the workflow and can only be viewed by users booking onto the action in the workstation. Version control cannot be applied to this document.
- Complete the Add/Edit Action input screen as described in the Add/Edit New Action section above.
- After creating the Rich Text Viewer action in the Operation Actions screen, select the action and click the Configure button to display the Rich Text Viewer - Design View screen. Here you can add content that will be displayed to operators working on this action.
Example: Rich Text Viewer document

Custom Action
Where the standard list of actions do not accommodate you shop floor requirement, you can use a custom action. Custom Actions allow you to design a workstation screen that is configured to meet your specific requirements.
- Complete the Add/Edit Action input screen as described in the Add/Edit New Action section above.
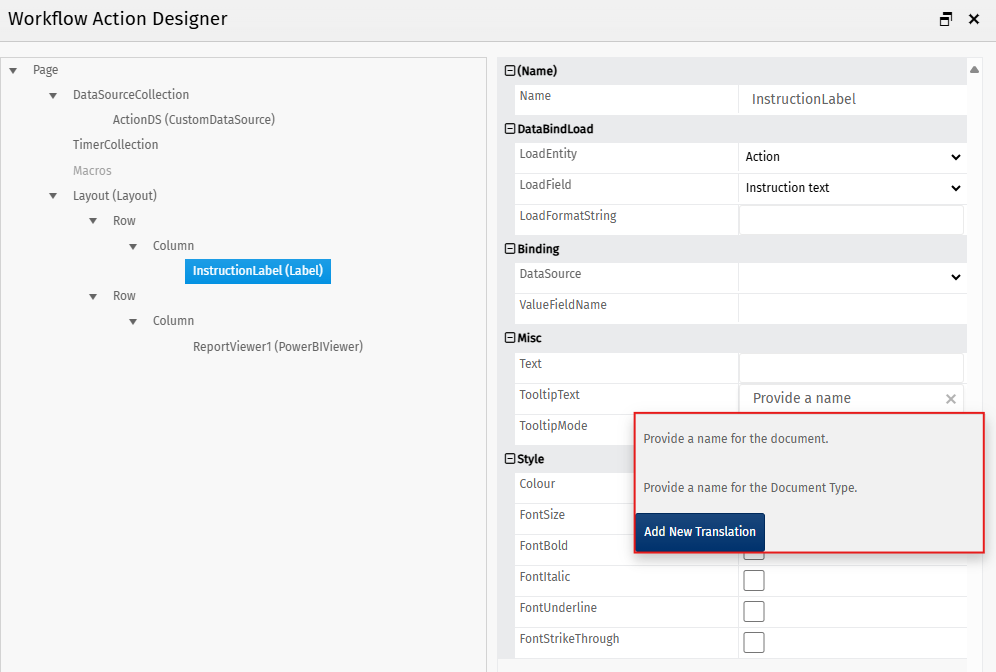
- After creating the Custom action in the Operation Actions screen, select the action and click the Configure button to display the Workflow Action Designer screen.
- Right click Layout (Layout) then click Layout and select Row. You have to create this first.
- Repeat step 3 but this time select Column.

- When you've created a column in step 3, you can right click and add controls. The following controls are available: Chart, CheckBox, Circular Gauge, ComboBox, Custom File Viewer, Date Picker, Dropdown List, Editor, Grid, HeatMap, Image Group, Label, Numeric TextBox, PowerBI Report Viewer, Radial Gauge, Simple Gauge, Slider, Textbox, Translation Dictionary.
Custom File Viewer
This control allows you to display a document in an action often with other controls. For example, you may want to display an example of a non conformance and requesting input from the operator regarding the item they are working on.
- Follow the steps to obtain the rows and columns required for the screen display as described at the beginning of this section.
- Upload the document into Document Manager so that it's available for selection in a later step.
- Right click Column and click Controls and select Custom File Viewer.CustomFileViewer1 (CustomFileViewer) will display under the column. Click on it.
- In the input screen, under Misc, provide a Name. This will replaced the generic name under the Layout in the left hand list. Note that spaces are not allowed neither are special characters other than the underscore "_".

- In the FileDataSource field, select CustomFile.
- In the Document field, select the document that will be displayed in the workstation. Note that if you selected a PDF document, you could specify the page number to open in the PdfOpenAtPage field
Note that when completing some fields (for example the ToolTip field) you will receive a pop-up of translations (text) you can select from. If the text doesn't already exist, you can choose to Add the New Translation or not to add it.
The image below shows an example of what a Custom File Viewer document could look in a workstation.

Tool Use
In a discreet environment, you'll typically use a Tool Use action.
For longer running batch processes you'll typically use the Tool Use Silent. The tool would be set up and would be used over the duration of the batch.
To create and configure a Tool Use action:
- Complete the Add/Edit Action input screen as described in the Add/Edit New Action section above. Make sure you selected the Action Button Profile.
- After creating the Tool Use action in the Operation Actions screen, select the action and click the Configure button to display the Tool Use Design pop-up. This screen shows the tool uses for this action.
- Click the New button to display the New Tool Use pop-up.
- Complete the Tool Use input screen.

Add/Edit Tool Use
Blue fields in the form are required and are flagged with an asterisk (*) in this document.
- Tool Selection Mode*: Specify which Tool Type, Tool Group or Tool may be used.
- Use Count*: How many times the tool will be used.
- Use Count Mode*: Whether the number of uses is dependant on qty/batch size. Options: Cycles Per Unit Of Production, Fixed.
- Location Filtering: Which location tools may be used from.
The number of tool cycles recorded in manufacture is dependant on the settings above and the number of active tool elements using the following formulae
- Tool Uses Recorded = Action Tool Use Count * Qty Produced/ Number active tool elements
Workstation Execution
The operator can record tool use by selecting a requirement and clicking Record Use.
The pop-up allows the operator to select a valid tool and record how many times it has been used. The No. Uses numeric box defaults to the full/outstanding uses to fulfil the requirement, but operators can override this (for example, if you have two operators using two different tools for the same job or a tool breaks/runs out of calibration and needs to be swapped halfway).
The operator cannot complete the action if there are tool uses outstanding against a requirement.

Tool Use (Silent)
In a discreet environment, you'll typically use a Tool Use action.
For longer running batch processes you'll typically use the Tool Use Silent. The tool would be set up and would be used over the duration of the batch.
When you use a silent tool use, you must locate a single tool of the type specified with the work centre location. Every time you complete a quantity, the system automatically tracks tool usage behind the scenes. It knows how many cycles occurred based on the quantities produced (or a fixed number of uses for the total qty if configured that way).
To create and configure a Tool Use (Silent) action:
- Complete the Add/Edit Action input screen as described in the Add/Edit New Action section above. Make sure you selected the Action Button Profile.
- After creating the Tool Use (Silent) action in the Operation Actions screen, select the action and click the Configure button to display the Tool Use Design pop-up. This screen shows the tool uses for this action.
- Click the New button to display the New Tool Use pop-up.
- Complete the Tool Use input screen.

Add/Edit Tool Use
Blue fields in the form are required and are flagged with an asterisk (*) in this document.
- Tool Selection Mode*: Specify which Tool Type, Tool Group or Tool may be used.
- Use Count*: How many times the tool will be used.
- Use Count Mode*: Whether the number of uses is dependant on qty/batch size. Options: Cycles Per Unit Of Production, Fixed.
- Location Filtering: Not configurable and displays the following message: "*Only allow use of tools from the Work Centre location".