Eyelit MES provides a hierarchical structure for inventory locations and ships with default organisation, warehouse, site and location initially configured.
You can however configure multiple organisations, sites, warehouses and locations if you would like to use Eyelit MES for more advanced logistics-related scenarios, e.g., managing purchase orders/dispatch orders, inventory and warehouse management or enhancing raw materials consumption controls.
Eyelit MES can also be extended to control some or all of the inventory and logistics element of supply chain.
This can include the management of stock locations around the shopfloor. In many customers the requirement for live visibility of the operation involves not just knowing what stage of production items are at, but also where they are physically located. Item genealogy does not always stop at manufacturing activity data, it can also include location. In addition, management of consumption of materials from restricted specified locations can facilitate efficient and accurate results, e.g., for backflush
Products are configured to be allowed to be stored in specified locations. This is important where stock cannot be stored just anywhere, i.e., a product might have to be stored in an Ex-rated warehouse if it is flammable, in a ground floor location if highly toxic, in a chilled warehouse if perishable.
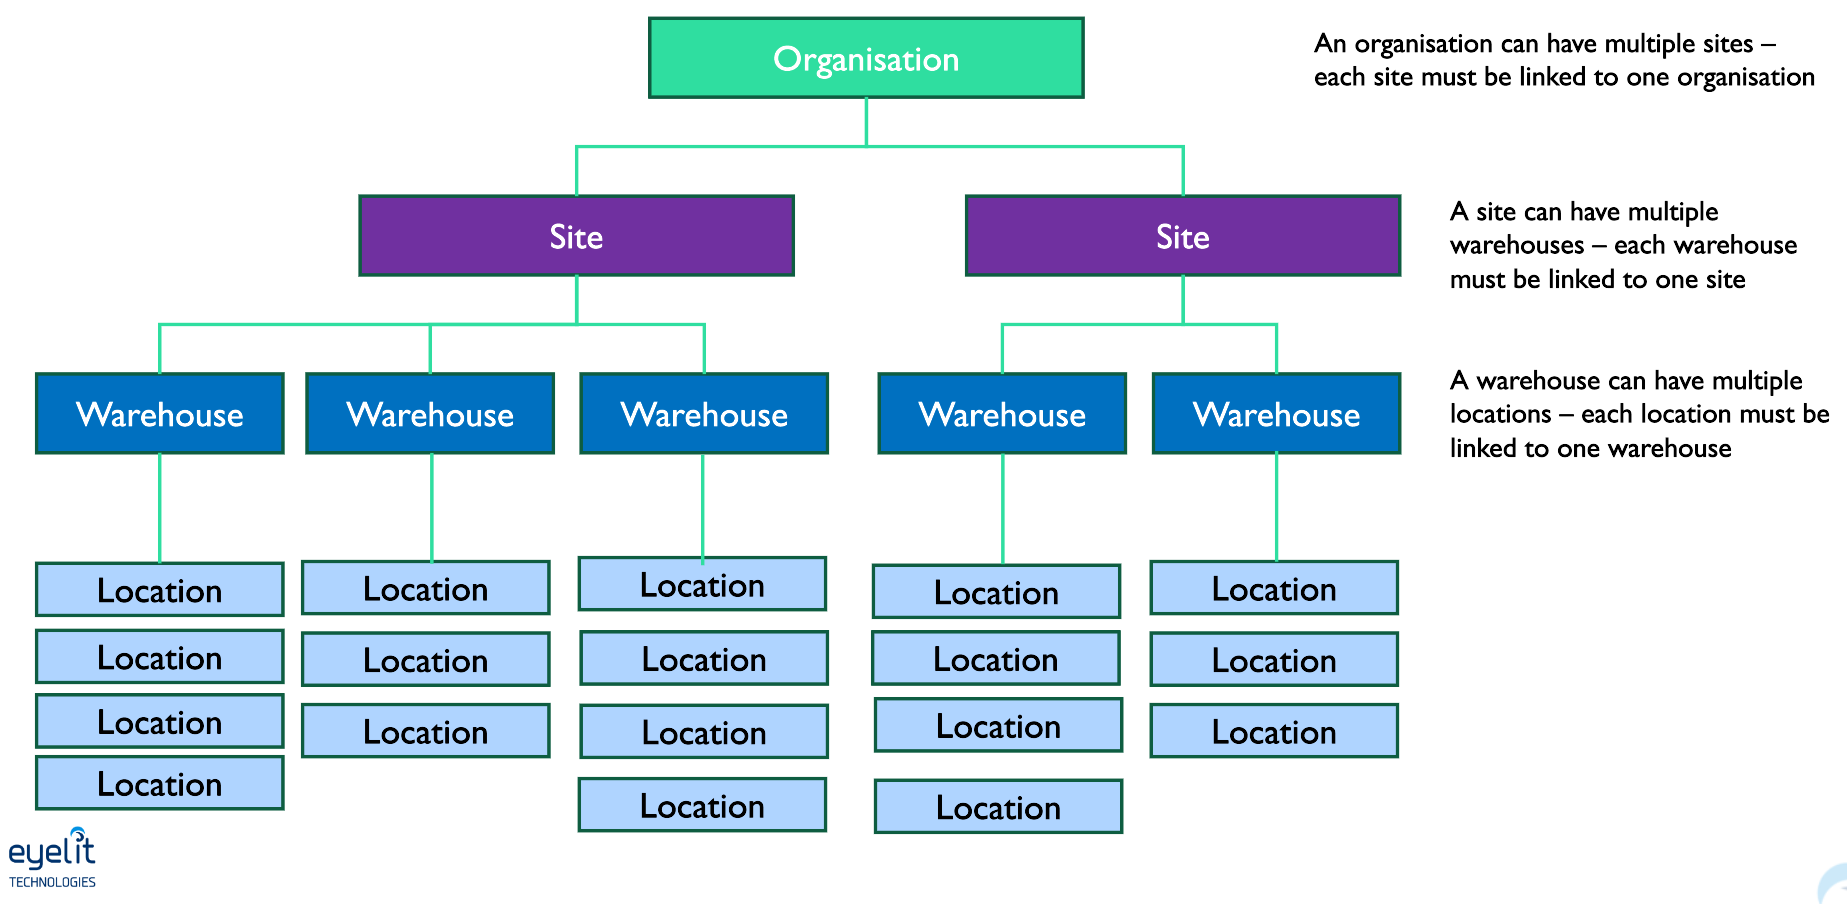
The image below describes how organisations, sites, warehouses and locations are structured and can be modelled in Eyelit MES.
Product Locations
If you choose to create granular locations within warehouses, these must be assigned on a product-by-product basis. This allows you to reflect any restrictions, such as:
- Products that can only be stored in certain areas (e.g., chilled goods or hazardous materials).
- Locations that are limited to specific products (e.g., chemical storage).
Each product will have a default location which is the place where it is typically created.
- For raw materials, this is usually a Goods In location, as that’s where stock enters the system.
- For manufactured products, the default location can be a generic shopfloor area, especially if products are first created as WIP in the same place.
Tool Locations
A Tool Type can be stored in a specified warehouse or set of locations (e.g. work centre locations). In some cases this can also control whether a tool can be used against a workflow action (e.g., if the tool must be in the correct work centre location).
The location mode options for Tool Types are:
Do Not Filter: Can be stored in any location.
Warehouse: Restricted to locations within a designated warehouse.
Location: Allows you to specify one or more locations for the tool to be located in. Note that some of these locations may only be able to have one tool of a type stored there at any one time, e.g., in a moulding machine you can only have one mould tool located in the machine at any one time. This restriction can be configured at a location level by selecting the Tool Type, clicking Location and then assigning locations/setting restriction as needed.
Organisations
Organisations are used to model internal operations, suppliers and customers. They can be used to facilitate purchase orders and dispatch orders, and to manage sub-contractor logistics.
The system is configured with a base data organisation Internal with a single site associated - Default. You can however create additional organisations and sites.
Create an organisation
To create an organisation in addition to the Internal organisation the system ships with:
- Navigate to the Organisations screen and click the New button.
- Complete the Add Organisation input screen.
Add/Edit Organisation
Blue fields in the form are required and are flagged with an asterisk (*) in this document.
- Name*: Provide an organisation name.
- Code: External reference for the organisation.
- Comments: Leave a comment.
External Organisations
Where Eyelit MES is managing or modelling the movement of goods between internal and external organisations (purchase orders, dispatch orders), the external organisations also need to be configured.
External organisations have sites but do not have warehouses or locations. Each external organisation needs to be configured to be a customer, a supplier, or both. If they are a customer or a supplier, this is indicated by the link to products and price.
Customer/Supplier
The Customer/Supplier details are configured per product.
To create a Customer/Supplier:
- Navigate to the Organisations screen and click the Customer/Supplier button.
- In the Customer/Supplier screen, click the New button to display the Assign Price pop-up.
- Complete the Assign Price input screen.
Add/Edit Assign Price
Blue fields in the form are required and are flagged with an asterisk (*) in this document.
- Price Type*: Select if the entity is a Customer or a Supplier.
- Product: Select the product applicable for this external organisation.
- Third Party Part Number: Part number used by the external organisation.
- Default price: Provide a default price.
- Currency*: Select a currency.
- Minimum Order Qty: The minimum order quantity allowed by the external organisation.
- Comments: Leave a comment.
- Lead Time: The time to delivery.
Sites
Sites are used to model geographic locations for an organisation. For example a manufacturer might have a production facility at a different address to a internal logistics warehouse. Modelling multiple sites facilitates managing transfer and dispatch orders between sites.
Create a Site
To create a site in addition to the Default site the system ships with:
- Navigate to the Organisations screen and click the Sites button.
- Complete the Add Site input screen and complete the Add Contact pop-up.
Add/Edit Site
Blue fields in the form are required and are flagged with an asterisk (*) in this document.
- Name*: Provide a site name.
- Address Type: Specify the address type. An organisation may have more than one address. For example, you may have a different address for each of the following: goods in, accounts receivable, admin, etc.).
- Complete the address details of the site.
- Click Save. This creates a Site and by default it is available for warehouse assignments.
Deactivate a Site
- Highlight the site you created and click the Edit button.
- Set Active field to No to deactivate the site.
Warehouse
You can add several warehouses to each site.
- Navigate to the Warehouse screen and click New to display the Add Warehouse pop-up.
Blue fields in the form are required and are flagged with an asterisk (*) in this document.
- Organisation*: Select an organisation.
- Site*: Select a site.
- Name*: Provide a name for the warehouse.
Contacts
You can add several contacts for an organisation, each contact having a different function. For example, you may have a contact for: goods in, receivables, etc.).
To add a contact:
- Navigate to the Organisations screen and select and organisation. The Contacts section is located at the bottom of the screen.
- In the Contacts section, click the New button
Add/Edit Contact
Blue fields in the form are required and are flagged with an asterisk (*) in this document.
- Site*: Select the site that the contact relates to.
- Contact Type*: Provide a description of the type of contact.
- Contact Name*: Provide the contact's name.
- Provide an email, phone number and comments.
- Is Active: Set to No to deactivate a contact that is no longer required.